Quickbooks Stands among the list of Leading accounting software that is being used by various business officials. The accounting software provides a secure environment for its users. Along with all this, the Premium and advanced features in the Quickbooks software enhance your accounting experience. In this blog, we will be discussing how you can set up a multi-user network to access Quickbooks software on multiple devices simultaneously.
Multi-User Network Setup in Quickbooks
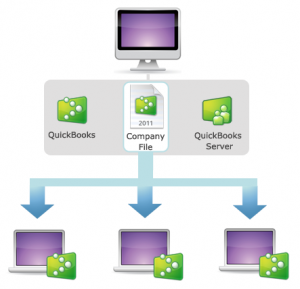
The prime advantage of the Quickbooks Multi-user network setup is that it allows multiple users to access the Quickbooks company file simultaneously. This will save a lot of time for the users and can ease the work. For companies, who have multiple employees who need to access the company file individually for their specific tasks assigned to them. Hence, In that case, you can set up the Quickbooks multi-user network to provide separate Quickbooks software for all the employees. However, you need to get Separate license copies to set up a multi-user network.
Requirements and Methods to Setup Quickbooks Multi-user Access Network
This Quickbooks program allows users to access the same company file simultaneously but then have to install the Quickbooks Software individually on their system. Based on the account, the access limit of the users is set.
- 3 users are allowed to access the company file in Quickbooks Pro.
- 5 Users can access the company file simultaneously in Quickbooks Premiere.
- Upto 30 users can access the file concurrently with the Quickbooks Enterprise version.
Check for the Following requirements Before setting up Quickbooks Multi-user Access Network
- Install Quickbooks Individually- make sure to install and set up the Quickbooks Software for each computer that is needed to be connected to the network.
- Check Windows File Permission: Make sure to log in as an administrator while setting up a multi-access network.
- Database Server Manager- Make sure to activate the Quickbooks Database manager program before starting the setup process.
Follow the steps to Set-up Multi-User Access in Quickbooks
We have listed below some of the best methods that can be used to set up multi-user access in Quickbooks.
Step: 1 Download and Install Quickbooks Desktop
- Download the Quickbooks installation file from the official website.
- Click on the installation file and follow the instructions.
- While installing, choose multi-host user installation.
Step: 2 Enable Multi-User Hosting
- Double-click on the Quickbooks Icon to start.
- Update the Quickbooks Company file to the latest release if prompted.
- Now open the file menu and choose the utilities option and then click on Host Multi-user access.
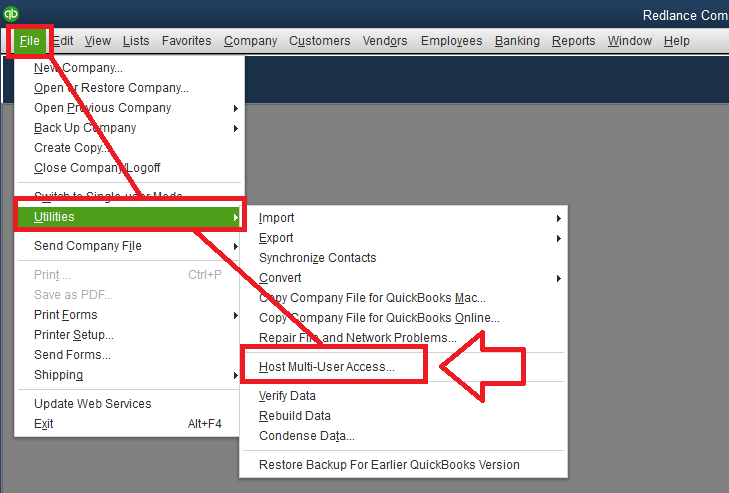
However, if you are already using the Multi-host access then move to the next step.
Step: 3 Enable windows and Folder Access Permissions
- Browser the folder where company files are stored and then right-click on it.
- Open the properties window by click on properties and then go to the security tab.
- Click on the edit option and select “QBDataServiceUserXX” and mark the “Full control” option.
- Choose the allow option and then click on Apply and Ok to save the changes.
- After this, enable the windows permissions to share the folders over the network.
Step: 4 Configure Desktop Security Settings
- Click on the start menu or press the Windows key and enter the firewall in the box.
- Choose the Windows Firewall from the option and then click on Advanced settings.
- Right-click on inbound rules and choose the “Next rule” option.
- After this click on the port option and then ok.
- After this, check the TCP connection and the ports that are required to connect for the Quickbooks version you are using.
- Choose the “Allow the connection” option and then look for all the check-box in the profiles and click on next.
- Now provide a name to this new rule and then click on the finish option.
- Once you are done, try opening the Quickbooks software in multi-user mode.
Step: 5 Check Files and Set Up Quickbooks Database manager
- Press the Windows key or start button and go to all programs and choose Quickbooks.
- Click on Quickbooks database Server manager and click on the scan folder option.
- Now click on add folder option and select the folder where you have saved the Quickbooks company files. If you want to add more folders then click on add folder option again.
- Now click on the scan folder option and then wait until the process completes.
- Now click on the Close button.
Step: 6 Configure Windows Admin Rights
- Click on the start menu and then go to accounts and click on Family and other options.
- Click on “Add someone else on this computer” and choose “I Don’t have this person’s sign-in information”.
- Now provide a name and password to this user and click on the finish option.
- Now set the administrator authorities for the user by click on the Account name and then account type.
- Now from the drop-down list click on the admin tab and then click on Ok to complete the process.
Step: 7 Alternative Way to Setup Quickbooks Multi-user Access
- Open the Quickbooks software and click on the files menu.
- Now click on the “Switch to multi-user mode” and then choose the “yes” option when prompted at Multi-user hosting window.
- Click on the ok option and then add the user to the network.
- Click on the company and then choose to set up users and passwords.
- Click on Setup users option and then click on Add users option.
So this way you can set up a Multi-user access network in Quickbooks Desktop. In case you have encountered Quickbooks Error 15241 then you can troubleshoot the error by configuring the Quickbooks FCS service. However, if you have any queries regarding this process then feel free to contact Quickbooks Experts.